Set up your team: your first week
An ordered checklist for team leaders: roles, permissions, commission profiles, goals, and the weekly rhythm that keeps the Dashboard honest.
A team account works best when the structure is in place before the first deal is logged. This checklist walks through that structure in order. Each step has a one-line reason and a link to the fuller guide, so you can skim here and go deeper where you need to.
The checklist
-
Accept your invite and choose Team Leader. Your invitation email opens the Complete your account page. After you set a password, the setup wizard opens on How do you work? Choose Team Leader so the account is created with the owner role, which is what unlocks the Permissions tab in Settings. The Team Splits tab is visible to every role, but by default only the owner role can change the compensation model on it. See Accept your invite and set up your account.
-
Confirm your lead sources. Open Settings from the bottom of the sidebar and select Lead Sources. The built-ins carry a Default badge; select Add Source for anything your team tracks that is not on the list. Do this before anyone adds a client, so every source picker shows the right choices from day one. See Lead sources, notifications, and your account.
-
Invite team members with the right roles. On the Team Members tab, select Add Team Member, enter the address in Email (the field is required), and pick a Role: Agent, Lead Buyer's Agent, Admin, ISA, or Transaction Coordinator. Team Leader also appears in the list, but it is your role, set when the account was created, and cannot be assigned here. The role decides what each person can see and do, so it is worth choosing carefully now. Members who have not accepted yet show a Resend Invite icon in the table. See Add team members and assign roles.
-
Set permissions. The Permissions tab shows one column per role and one row per capability, grouped under Team Management, Data Visibility, and Settings. Each toggle saves as you change it. Look closely at View full commission details: it is on by default for Admin, always on for you as Team Leader, and off for every other role, so agents see their own income but not team splits or other agents' commissions. Decide whether that matches how your team works. See Set what each role can do.
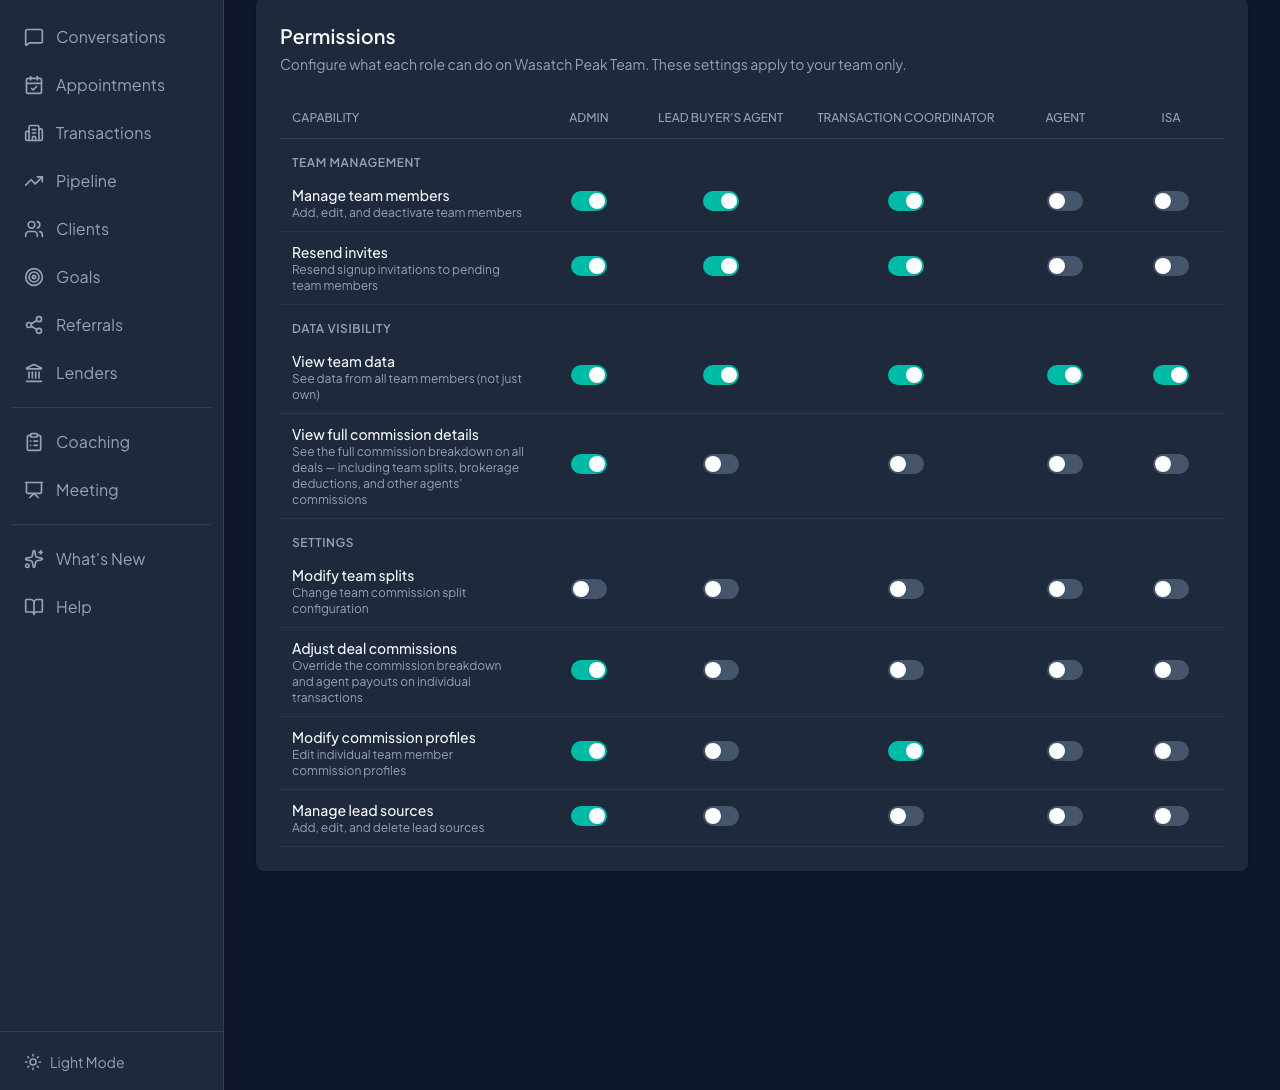 Settings, Permissions tab: one column per role, one row per capability
- Choose your model and set each commission profile. On the Team Splits tab, answer How does the team leader get paid? by choosing I Am The Team or I'm Also An Agent. Then, under Team Member Commission Profiles, each member without a profile shows No profile configured and a Create from defaults link. Members who have already accepted their invite get a profile automatically. Select Create from defaults for anyone still showing No profile configured, then expand a row to refine side splits, graduated splits, fees, and brokerage terms. Percentages are what the team member keeps. See Configure team splits and commission profiles.
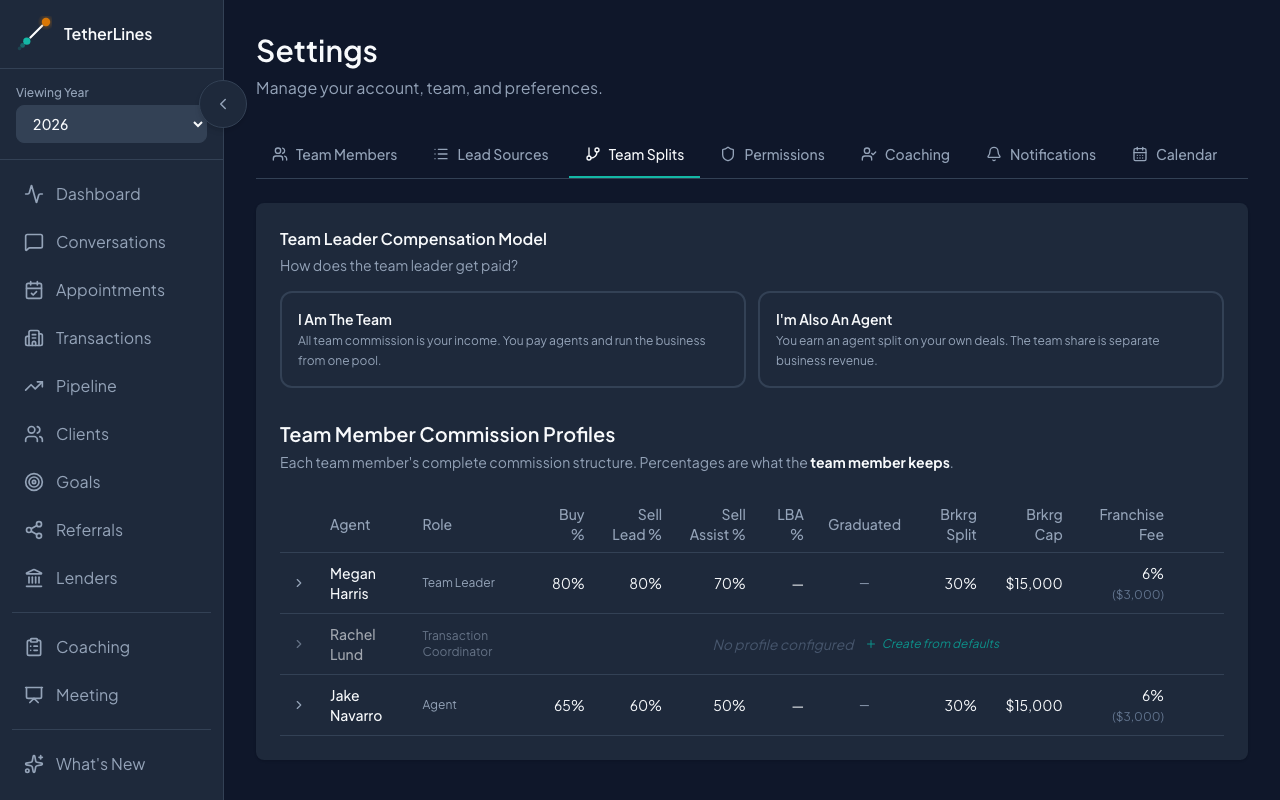 Settings, Team Splits tab: the team leader model on top, then one row per team member
-
Set goals for each agent. Open Goals, and in the Set Goals form pick the Agent before entering targets, then select Save Goal. Repeat for each member. Their Dashboard rings measure against these numbers, and a member without goals has no pace to read. See Set goals and track your pace.
-
Ask members to install the app and log conversations weekly. Installed on a phone, TetherLines opens from its own icon and stays signed in, which helps the weekly habit stick. Each member opens Conversations, enters a count for each day, and selects Save Week. Conversations are the leading indicator; everything downstream follows from them. See Install TetherLines on your phone and Log your conversations.
-
Read the Dashboard. The View selector at the top opens on Team Total; pick one agent's name to see their rings and pace on their own. Under each ring the status reads Ahead by N, On pace, On pace, slipping, or The gap is N. A short weekly look here is the whole point: small gaps get small corrections. See Welcome to TetherLines.
A note on order
Steps 2 through 5 matter most before the first deal is logged. Lead sources feed the client form, roles and permissions shape what each person sees, and commission profiles decide how a closed deal is split. All of it can be changed later, but the first transactions will be cleaner if the structure comes first.